
A Year in the Hive: Beekeeping Tasks by Season
A Year in the Hive
Ruth O’Neill, Research Associate
Wanner Crop Entomology Lab, Plant Sciences & Plant Pathology
Bee hive maintenance involves a yearly cycle of feeding, adjusting hive components, making repairs, honey harvesting, and winterizing. Below is a monthly breakdown of basic beekeeping tasks for Montana and most northern-tier states in the U.S. Numbered items are discussed in more detail below the table.
|
Activity |
JAN |
FEB |
MAR |
APR |
MAY |
JUN |
JUL |
AUG |
SEP |
OCT |
NOV |
DEC |
|
|
1 |
Assemble / repair / replace equipment |
X |
X |
|
|
|
|
|
|
|
|
X |
X |
|
2 |
Check entrance for blockage |
X |
X |
X |
|
|
|
|
|
|
|
X |
X |
|
3 |
Order new bees |
X |
|
|
|
|
|
|
|
|
|
|
|
|
4 |
Check food reserves if weather permits |
|
X |
X |
X |
X |
|
|
|
X |
X |
|
|
|
5 |
Feed sugar syrup / fondant |
|
|
X |
X |
X |
|
X |
X |
X |
|||
|
6 |
Feed pollen or a pollen substitute |
|
|
X |
X |
X |
|
|
|
|
|
|
|
|
7 |
Check for queen |
|
|
|
|
X |
X |
X |
X |
X |
|
|
|
|
8 |
Check for eggs, capped brood and brood pattern |
|
|
|
X |
X |
X |
X |
X |
||||
|
9 |
Look for swarm cells |
|
|
|
|
X |
X |
X |
|
|
|
|
|
|
10 |
Look for supersedure cells |
|
|
|
|
X |
X |
X |
X |
X |
|
|
|
|
11 |
Reverse hive bodies |
|
|
|
|
X |
|
|
|
|
|
|
|
|
12 |
Routine monitoring for Varroa mites |
|
|
|
|
X |
|
|
|
X |
|
|
|
|
13 |
Remove feeder |
|
|
|
|
X |
|
|
|
|
|
|
|
|
14 |
Add queen excluder and first honey super* |
|
X |
||||||||||
|
15 |
Check surplus honey (for winter bee food) |
|
|
|
|
|
|
|
X |
X |
|
|
|
|
16 |
Harvest honey |
|
|
|
|
|
|
|
X |
X |
|
|
|
|
17 |
Wrap hive |
|
|
|
|
|
|
|
|
X |
X |
|
|
|
18 |
Reduce entrance size, ensure upper ventilation |
|
|
|
|
|
|
|
|
X |
X |
|
|
|
19 |
Add mouseguard, straw bale windbreak if needed |
|
|
|
|
|
|
|
|
X |
X |
|
|
*Do not medicate hives when honey supers are in place; always read all pesticide product labels carefully before use.
- Assemble / repair / replace equipment. During the winter months (November through February) there is not much work to be done with bee hives. Winter is an ideal time to clean up dirty equipment, repair or replace broken frames and boxes, and catch up on bee-related reading.
- Check entrance for blockage. On warm winter days, bees fly out of the hive to defecate. The hive entrance must be clear of ice and snow for defecation as well as good hive ventilation.
- Order new bees. If you are starting with a new hive, call your supplier and reserve a package of bees no later than the end of February. If your hive set-up is not quite ready for bees yet, that’s okay because you will not receive the package from the supplier right away. Typically, bee packages are shipped early in May. This gives you extra time to choose the hive site and order the hive components and maintenance tools.
- Check food reserves. Don’t ever open the hive to check food reserves unless is it warm outside (many beekeepers suggest a 60°F minimum and calm conditions). An alternative is to lift one edge of the hive to test its weight. With some experience you can tell if there is honey left for the bees. If the hive is light, you will need to start feeding.
- Feed bees a 1:1 sugar:water syrup (e.g., one 5-lb. bag of sugar and 2 ½ quarts hot tap water). You can also feed bee candy (fondant), for which there are numerous recipes available on the internet. Be careful when cooking the sugar, as caramelized sugar is not safe for bees.
- Feed pollen or a pollen substitute. These items can be purchased from many bee supply houses. There are also a number of recipes for home-made pollen substitute available on the internet.
- Check for queen. The queen is the center of attention among workers, which can be helpful in locating her on the combs, especially if she isn’t marked with colored paint.
- Check for eggs, capped brood and brood pattern. Even if you can’t locate the queen
right away, you can check for clean cells filled with healthy eggs and brood, capped
brood, and a nicely clustered brood pattern. This will tell you that the queen is
alive and well.
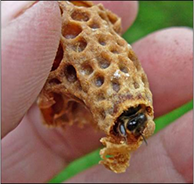 Look for swarm cells, usually located along the bottoms of frames. The usual advice
is to break them off. Swarm cells house developing new queens; they are made when
the hive is begins preparing to swarm – something most beekeepers do not want to happen.
More advanced beekeepers sometimes preserve them and establish new start-up colonies
by one of several methods.
Look for swarm cells, usually located along the bottoms of frames. The usual advice
is to break them off. Swarm cells house developing new queens; they are made when
the hive is begins preparing to swarm – something most beekeepers do not want to happen.
More advanced beekeepers sometimes preserve them and establish new start-up colonies
by one of several methods.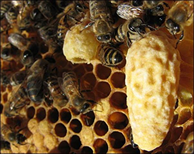 Look for supersedure cells, usually located in the middle of combs. Like swarm cells,
these are created by workers for rearing new queens. Supersedure queens are back-ups,
created as an insurance policy in case the current queen dies or performs poorly.
Workers build empty cells (“queen cups”) and the queen periodically chooses to lay
eggs in some (one per cup) to keep emergency replacement queen larvae on hand. These
larvae are usually destroyed before emergence because they aren’t needed. But if
workers are beginning to rear more than three or four queen larvae in these supersedure
cells then you may need a new queen. You may choose to allow supersedure to occur,
or you may remove them and buy a new queen from a supplier.
Look for supersedure cells, usually located in the middle of combs. Like swarm cells,
these are created by workers for rearing new queens. Supersedure queens are back-ups,
created as an insurance policy in case the current queen dies or performs poorly.
Workers build empty cells (“queen cups”) and the queen periodically chooses to lay
eggs in some (one per cup) to keep emergency replacement queen larvae on hand. These
larvae are usually destroyed before emergence because they aren’t needed. But if
workers are beginning to rear more than three or four queen larvae in these supersedure
cells then you may need a new queen. You may choose to allow supersedure to occur,
or you may remove them and buy a new queen from a supplier.- Reverse hive bodies. Bees tend to concentrate brood in the upper brood box, which can encourage swarming. Putting the emptier box on top gives the colony room to expand.
- Routine monitoring for Varroa mites.
- Remove feeder.
- Add queen excluder over top brood box and add first honey super. During the course of the summer you will add more honey supers as needed.
- Check surplus honey (for winter bee food). A typical hive eats 60-90 pounds of honey. If there is not enough honey in the brood boxes, you will need to leave one of the full supers on the hive.
- Harvest honey.
- Wrap hive to insulate against cold. A simple way to wrap is to attach sheets of 1” Styrofoam (extending all the way to the ground) with bungee cords. The top must also be heavily insulated to prevent condensation dripping on the bee cluster during cold weather. Filling an empty shall super box with Styrofoam, wool, or another insulating material works well.
- Reduce entrance size, ensure upper ventilation. Several ¼” diameter holes in the upper brood box (plus the small entrance opening at the bottom) will give sufficient air flow to keep the hive dry.
- Add mouseguard, straw bale windbreak if needed. A simple way to keep mice out is to nail a few finish nails through the opening in the entrance reducer, creating “jail bars” that allow bees to squeeze through, but not mice. Straw bales are helpful in windy areas, but can attract mice.